Building a zero-shot image classifier with CLIP and HuggingFace Transformers
December 27, 2023 by Chris
The CLIP model by OpenAI is a model which really fascinates me. When it was released in 2021, it was the first approach that successfully paired images with texts at scale. It does so by learning similarities between text-image pairs. For this reason, it can be used for zero-shot classification. This is also known as classification without being explicitly trained and without any explicit examples up front.
The article linked above gives you a deeper understanding of CLIP, its components and why it works. Instead, this articles focuses on building something valuable with these tools: a zero-shot image classifier. Indeed, we're going to build a pipeline that is capable of classifying an image - by text. That is, you provide the classes in text; you provide the image; the model does the rest.
It is structured as follows:
- Why CLIP works: first, you'll get a quick summary of the article linked above. In my view, it's important to understand why technology works before using it. That's why we're focusing at how and why CLIP works at a high level first. You can then read the other article if you'd like to understand CLIP in more detail.
- Building the zero-shot image classifier: this is followed by actually building the classification pipeline. It's done by specifying a configuration in JSON, loading it, then using
CLIPProcessorandCLIPModelto classify the loadedimage. - Showing some examples: simple examples, which show good performance out of the box, and more difficult ones, where this is not guaranteed. Also, you'll see how easy it is to swap classes, allowing you to use the loaded classifier for something new.
Let's take a look! 😎
Why can CLIP be used for zero-shot image classification?
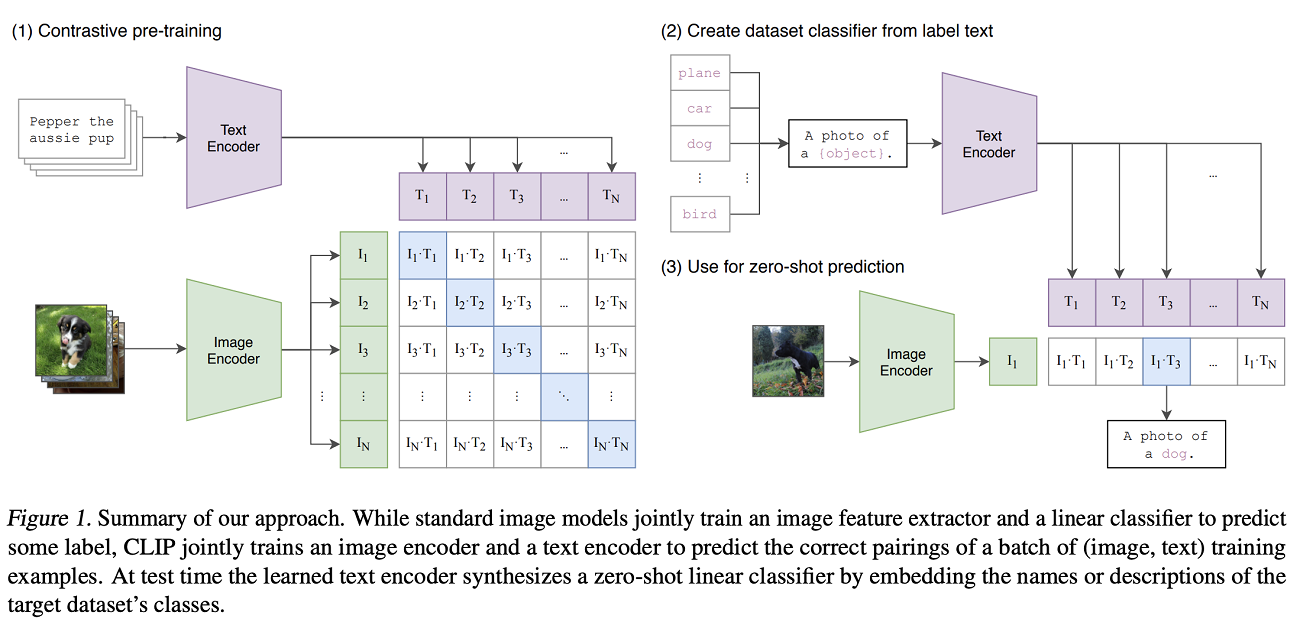
The CLIP model, which stands for Contrastive Language-Image Pre-training, is a 2021 OpenAI model. It is the first of its class and is capable of predicting similarity of pairs of texts and images at scale. Contrary to previous approaches (which attempt to do the same by using predictive modelling, i.e. predicting the text label for a corresponding image which serves as model input), CLIP uses a contrastive approach which contrasts between correct and incorrect pairs.
By consequence of training this model at scale, with the text Transformer and the vision Transformer trained concurrently, the embeddings of correct text/image pairs will have high similarity whereas those of incorrect ones have low similarity. This can be used for classifying images in a zero-shot fashion, as illustrated below (Radford et al., 2021):
Building a zero-shot image classifier
Let's now build the actual zero-shot classifier! Open your IDE or a Jupyter Notebook and create a new file (e.g. clipzeroshot.py or its Notebook equivalent), to ensure that we can get to work.
Imports
Of course, building anything with Python requires specifying a set of imports. Let's specify all of them - and why we need them - and then add the first lines of code to our script:
PILis required for loading the image (asImage) and providing a format that can be passed to the CLIP model.transformersis used for loading the CLIP model (CLIPModel) and the CLIP processor (which converts the inputs into an encoded representation;CLIPProcessor). Also,BatchEncodingis imported (because it's the type of what one of the definitions that follows will return).- In the background, everything runs in PyTorch, so
torchis imported for defining a return type. - Finally, there are some Python imports:
loggingfor logging,osfor specifying paths andjsonfor parsing a string as JSON.
Here's everything in code:
from PIL import Image
from transformers import CLIPProcessor, CLIPModel
from transformers.tokenization_utils_base import BatchEncoding
import torch
import logging
import os
import json

logging.basicConfig(level=logging.INFO)
JSON-based configuration
I'm a big fan of separating the configuration of a program from its code. That is, whenever possible, I try to avoid hardcoding details into a script. Even though you'll see many of the benefits mostly with large software programs, it too is nice in smaller ones. Hence, let's specify a configuration (save it as configuration.json in the same folder as your .py script) that specifies:
-
What
processorand whatmodelto use. We're usingclip-vit-base-patch32.The model uses a ViT-B/32 Transformer architecture as an image encoder and uses a masked self-attention Transformer as a text encoder (Radford et al., 2021).
-
What classes must be used in generating the prediction. Indeed, the beauty of CLIP is that through learning
(text, image)similarity pairs it is possible to generate a classifier by text only (the authors discuss this in their paper, by arguing that the CLIP framework essentially produces a hypernetwork. It is one of the things of CLIP which I find most fascinating!):[The] image encoder is the computer vision backbone which computes a feature representation for the image and the text encoder is a hypernetwork (Ha et al., 2016) which generates the weights of a linear classifier based on the text specifying the visual concepts that the classes represent (Radford et al., 2021).
-
Next, you'll specify the
imagepath.
In other words,
{
    "processor": "openai/clip-vit-base-patch32",
    "model": "openai/clip-vit-base-patch32",
    "classes": [
        "spaceship",
        "fisherman's boat",
        "tanker"
    ],
    "image": "./image_to_classify.jpg"
}
is your configuration for today.
Feel free to make some adaptations, such as specifying more or fewer classes, changing them, and so forth!
In your Python script, add a def which opens the configuration file, parses its JSON contents and returns a dictionary:
def load_configuration(path: str = os.path.join(os.getcwd(), "configuration.json")) -> dict:
    """
    Loads the configuration file.

    Args:
        path (str, optional): The path to the configuration file. Defaults to "config.json".

    Returns:
        dict: The configuration
    """
    with open(path, "r") as f:
        return json.load(f)
Getting an instance of the CLIPModel
Next step: getting an instance of the CLIP model!
With transformers, this is really easy: you'll just specify the class, tell it to use a pretrained model, et voila. That's the minimum amount of work necessary to load the CLIP model.
Indeed, as suggested before, we're using the openai/clip-vit-base-patch32 pretrained CLIP model. You will see that it is passed from the configuration file later, but to ensure the def keeps working out of the box, it is passed as the default value too (if passing a value is omitted, it will be used too).
def get_model(model: str = "openai/clip-vit-base-patch32") -> CLIPModel:
    """
    Returns the CLIP model which uses a vision transformer and a language transformer to map images and text to a common latent space.
    Subsequently, the similarity between the two can be measured using cosine similarity and used to classify images.

    Args:
        model (str, optional): The model to use. Defaults to "openai/clip-vit-base-patch32".

    Returns:
        CLIPModel: The CLIP model
    """
    return CLIPModel.from_pretrained(model)
Getting an instance of the CLIPProcessor
The same is true for the processor, which essentially wraps the image processor and text processor for easy generation of encoded texts and images:
The
CLIPProcessorwrapsCLIPImageProcessorandCLIPTokenizerinto a single instance to both encode the text and prepare the images (HuggingFace, n.d.)
Just call from_pretrained on the CLIPProcessor class with the pretrained processor (the OpenAI one in our case, also as default) and that's it:
def get_processor(processor: str = "openai/clip-vit-base-patch32") -> CLIPProcessor:
    """
    Returns the CLIP processor which uses the CLIP tokenizer to convert text and images to features.

    Args:
        processor (str, optional): The processor to use. Defaults to "openai/clip-vit-base-patch32".

    Returns:
        CLIPProcessor: The CLIP processor
    """
    return CLIPProcessor.from_pretrained(processor)
The image to classify
Let's now focus on the image that must be classified.
I've asked DALL-E 3 to generate an image.
Show me what a fisherman's boat looks like.
We'll save it as image_to_classify.jpg into the same folder as the Python script, because that's what we've configured in the configuration JSON above. If you wish to store the image in a different location, feel free to adapt the configured path yourself.
Clearly, out of the 3 possible classes in the configuration, this is a fisherman's boat.

Encoding inputs
Now that we have an image, it's time to use the instantiated processor to encode the textual and image inputs.
We create another definition for this: it accepts the processor, the loaded image and a set of classes, which are just strings. It passes them to the processor (specifying that return tensors must be torch ones) and returns the result.
def get_encoded_input(processor: CLIPProcessor, image: Image.Image, classes: list[str]) -> BatchEncoding:
    """
    Returns the encoded input for the CLIP model.

    Args:
        processor (CLIPProcessor): The CLIP processor
        image (Image.Image): The image
        classes (list[str]): The classes

    Returns:
        BatchEncoding: The encoded input.

    """
    return processor(text=classes, images=image, return_tensors="pt", padding=True)
Getting a prediction
Okay, now it's time for the actual magic. If we pass the encoded_input to the model, it generates a prediction. That's what we do in the def below, and we subsequently extract the image logits. Depending on whether we want to apply Softmax (this is not strictly necessary, but will give you a nice distribution of which the components sum to 1) we apply it, then return the prediction.
def get_prediction(model: CLIPModel, encoded_input: BatchEncoding, use_softmax: bool = True) -> torch.Tensor:
    """
    Returns the prediction for the CLIP model.

    Args:
        model (CLIPModel): The CLIP model
        encoded_input (BatchEncoding): The encoded input
        use_softmax (bool, optional): Whether to use softmax. Defaults to True.

    Returns:
        torch.Tensor: The prediction
    """
    prediction = model(**encoded_input).logits_per_image

    if use_softmax:
        prediction = prediction.softmax(dim=-1)

    return prediction
Merging everything together
We now have all the components ready! Time to merge them together into a main def which we use when running the script.
Here's what is happening:
- The configuration is loaded.
- The model and processor are retrieved and the image is opened.
- The image and classes are encoded and fed to the model for generating a prediction.
- The prediction is converted into an expected target class and both are logged.
That's it!
def main() -> None:
    """
    The main function which runs the script.

    Returns:
        None
    """
    config = load_configuration()
    model = get_model(config["model"])
    processor = get_processor(config["processor"])
    image = Image.open(config["image"])
    encoded_input = get_encoded_input(processor, image, config["classes"])
    prediction = get_prediction(model, encoded_input)

    predicted_class = config["classes"][prediction.argmax()]

    logging.info(f"Prediction over classes: {prediction.tolist()}")
    logging.info(f"Predicted class: {predicted_class}")

if __name__ == "__main__":
    main()
Classification examples
Let's now run our script. It's very easy: just run python clipzeroshot.py (ensure that you have all the dependencies installed). What follows next are results from a few examples; some simple ones, some difficult ones, and a different set of classes, showing you how easy it is to change classes and re-use the model for something else.
Easy ones
First, the fisherman's boat.
INFO:root:Prediction over classes: [[0.00018303414981346577, 0.9983105659484863, 0.0015064344042912126]] INFO:root:Predicted class: fisherman's boat
Now a spaceship:
INFO:root:Prediction over classes: [[0.9909811615943909, 0.001415808335877955, 0.007602964993566275]] INFO:root:Predicted class: spaceship

More difficult ones
Let's make it a bit more difficult now.
Mix the spaceship and the fisherman's boat, with a ratio of approximately 70% to 30%.
I have never seen such a strange object before, but here goes:
INFO:root:Prediction over classes: [[0.7287755012512207, 0.26701247692108154, 0.004212076310068369]] INFO:root:Predicted class: spaceship
Indeed, as expected, it is still classified as a spaceship, but the fisherman's boat has a 26.7% probability, suggesting that it's indeed a mix (and interestingly, with ~73% / ~27% vs ~0% quite close to the 70%/30% mix from the prompt!)

Swapping the classes: the beauty of CLIP
Before, I suggested how easy it is to swap the classes. Let's do so by changing the JSON:
{
    "processor": "openai/clip-vit-base-patch32",
    "model": "openai/clip-vit-base-patch32",
    "classes": [
        "apple",
        "not an apple"
    ],
    "image": "./image_to_classify.jpg"
}
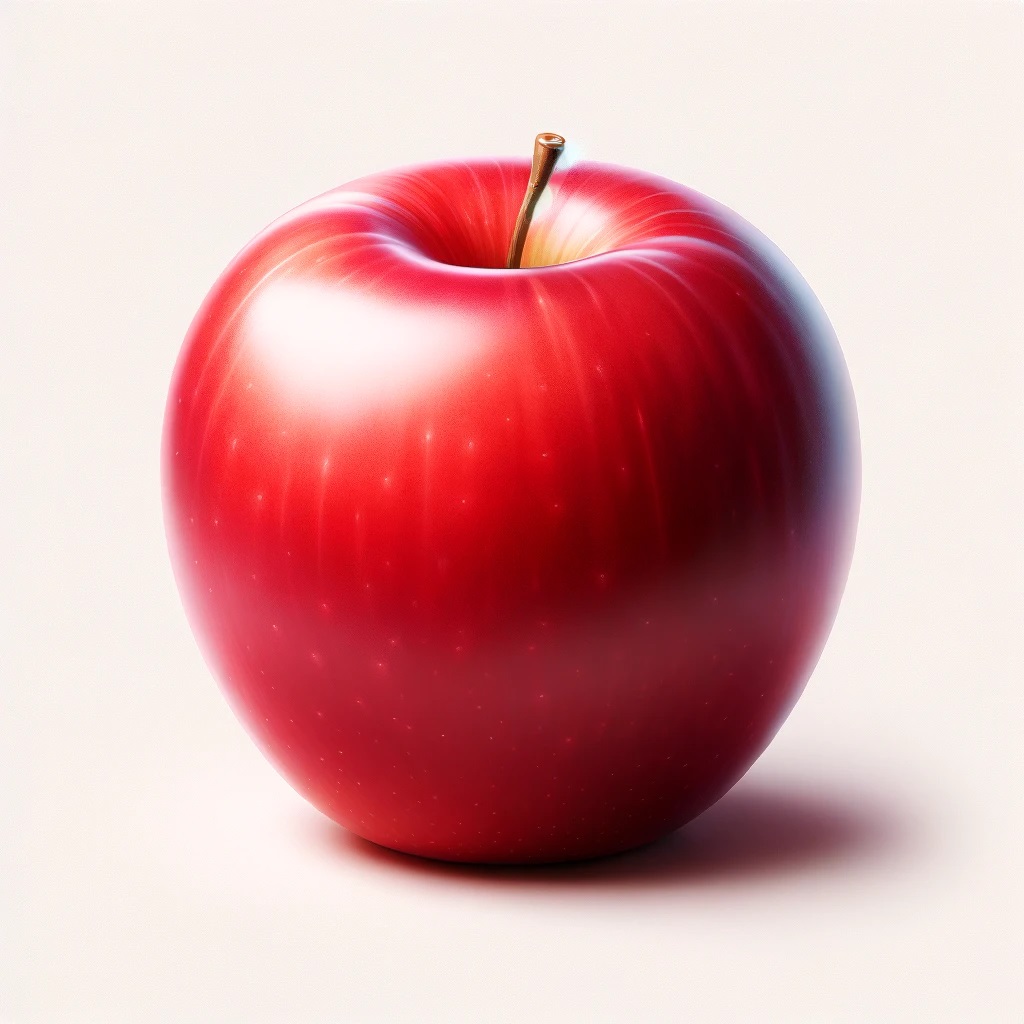
Time to classify this apple. And indeed:
INFO:root:Prediction over classes: [[0.5734764337539673, 0.4265235960483551]] INFO:root:Predicted class: apple
(However, you can see that the model is not really certain, probably because the large empty background. If we had used apple and banana instead, the class probabilities would have been 0.999/0.001.)
References
HuggingFace. (n.d.). Openai/clip-Vit-base-patch32 · Hugging face. Hugging Face – The AI community building the future. https://huggingface.co/openai/clip-vit-base-patch32
Radford, A., Kim, J. W., Hallacy, C., Ramesh, A., Goh, G., Agarwal, S., ... & Sutskever, I. (2021, July). Learning transferable visual models from natural language supervision. In International conference on machine learning (pp. 8748-8763). PMLR.
HuggingFace. (n.d.). Clip. Hugging Face – The AI community building the future. https://huggingface.co/docs/transformers/model_doc/clip#usage-tips-and-example
MachineCurve. (2023, December 22). CLIP: How it works, how it's trained and how to use it. MachineCurve.com | Machine Learning Tutorials, Machine Learning Explained. https://machinecurve.com/index.php/2023/12/22/clip-how-it-works-is-trained-and-used

Hi, I'm Chris!
I know a thing or two about AI and machine learning. Welcome to MachineCurve.com, where machine learning is explained in gentle terms.
Getting started
Foundation models
Learn how large language models and other foundation models are working and how you can train open source ones yourself.
Keras
Keras is a high-level API for TensorFlow. It is one of the most popular deep learning frameworks.
Machine learning theory
Read about the fundamentals of machine learning, deep learning and artificial intelligence.
Most recent articles
January 2, 2024
What is Retrieval-Augmented Generation?
December 27, 2023
In-Context Learning: what it is and how it works
December 22, 2023
CLIP: how it works, how it's trained and how to use it
Article tags
Most popular articles
February 18, 2020
How to use K-fold Cross Validation with TensorFlow 2 and Keras?
December 28, 2020
Introduction to Transformers in Machine Learning
December 27, 2021
StyleGAN, a step-by-step introduction
July 17, 2019
This Person Does Not Exist - how does it work?
October 26, 2020
Your First Machine Learning Project with TensorFlow 2.0 and Keras
Connect on social media
Connect with me on LinkedIn
To get in touch with me, please connect with me on LinkedIn. Make sure to write me a message saying hi!
Side info
The content on this website is written for educational purposes. In writing the articles, I have attempted to be as correct and precise as possible. Should you find any errors, please let me know by creating an issue or pull request in this GitHub repository.
All text on this website written by me is copyrighted and may not be used without prior permission. Creating citations using content from this website is allowed if a reference is added, including an URL reference to the referenced article.
If you have any questions or remarks, feel free to get in touch.
TensorFlow, the TensorFlow logo and any related marks are trademarks of Google Inc.
PyTorch, the PyTorch logo and any related marks are trademarks of The Linux Foundation.
Montserrat and Source Sans are fonts licensed under the SIL Open Font License version 1.1.
Mathjax is licensed under the Apache License, Version 2.0.