How to build a ResNet from scratch with TensorFlow 2 and Keras
January 20, 2022 by Chris
In computer vision, residual networks or ResNets are still one of the core choices when it comes to training neural networks. These networks, which implement building blocks that have skip connections over the layers within the building block, perform much better than plain neural networks. In today's article, you're going to take a practical look at these neural network types, by building one yourself - from scratch!
After reading this tutorial, you will understand...
- What residual networks (ResNets) are.
- How to build a configurable ResNet from scratch with TensorFlow and Keras.
- What performance can be achieved with a ResNet model on the CIFAR-10 dataset.
In other words, by learning to build a ResNet from scratch, you will learn to understand what happens thoroughly.
Are you ready? Let's take a look! 😎
What are residual networks (ResNets)?
Training a neural network is really difficult. Especially in the early days of the deep learning revolution, people often didn't know why their neural networks converged to an optimum... and neither why they did not.
If you're familiar with machine learning (and likely you are when reading this tutorial), you have heard about vanishing and exploding gradients. These two problems made training neural networks really difficult. However, interestingly and strangely, even when replacing classic activation functions with ReLU nonlinearities and adding Batch Normalization, a problem persisted. He et al. (2016) clearly described it in their paper Deep residual learning for image recognition: a neural network that has more layers would possibly perform worse than one with fewer layers.
And this goes directly against what should be possible in theory. In fact, a neural network with more layers is increasingly able to learn the feature representations that are necessary for achieving good performance. But adding layers made performance worse. Strange, isn't it?
Shattering gradients, where neural network gradients resemble white noise during optimization, may lie at the basis of this problem. And residual networks or ResNets for short help overcome this problem. A ResNet is a neural network that is composed of residual building blocks: weighted layers to which a skip connection is added. This skip connection allows information to pass more freely, and gradients to be more realistic. The image below shows a residual building block:
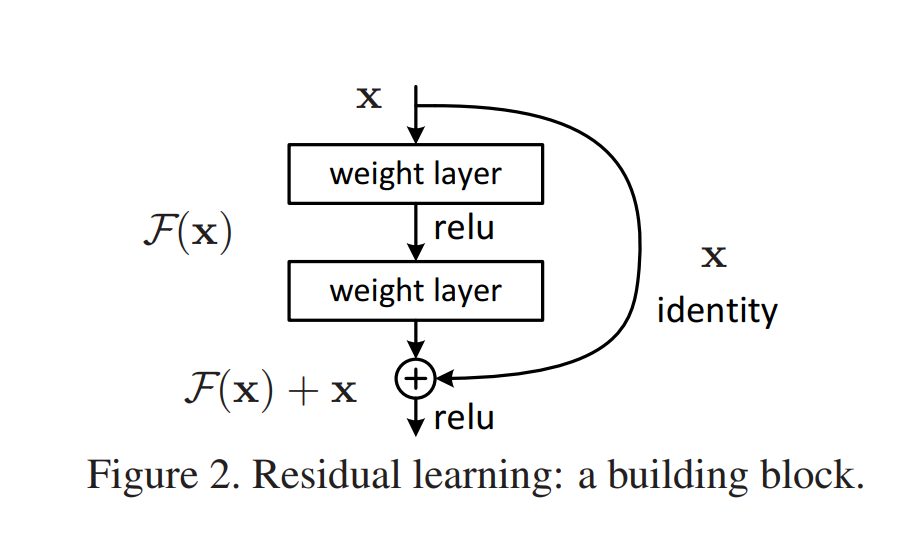
Source: He, K., Zhang, X., Ren, S., & Sun, J. (2016). Deep residual learning for image recognition. In Proceedings of the IEEE conference on computer vision and pattern recognition (pp. 770-778).
In practice, using today's deep learning libraries, building the skip connection is really easy. The skip connection \(\textbf{x}\) displayed in the image can simply be added to the output of the regular block. As you will see, however, this sometimes produces issues related to dimensionality and feature map size (i.e., width and height). He et al. describe two ways of resolving this, and you will explore both in the remainder of this tutorial:
- An identity mapping, which simply maps the input to the output, adding padding or reducing feature map size where necessary.
- A projection mapping, which uses convolutions to generate an output that 'clicks' onto the next residual building block.
If you're interested in the theory behind ResNets, you can read this article. Let's now take a closer look at building a simple ResNet. In today's tutorial, we're going to use TensorFlow 2 and Keras for doing so.
Building a simple ResNet with TensorFlow
Now that you understand what residual networks are, it's time to build one! Today, you'll use TensorFlow and the Keras Sequential API for this purpose. But first, let's take a look at the dataset that you will be training your ResNet model on.
In creating the ResNet (more technically, the ResNet-20 model) we will follow the design choices made by He et al. (2016) as much as possible. That way, we hope to create a ResNet variant that is as proper as possible. Whenever we deviate from He et al.'s design decisions (and that happens only marginally), we will provide arguments for doing so.
Today's dataset: CIFAR-10
The CIFAR-10 dataset is a widely known dataset in the world of computer vision.
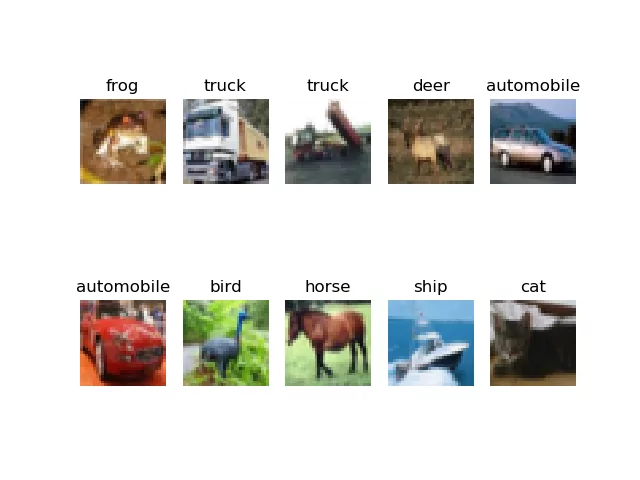
The CIFAR-10 dataset consists of 60000 32x32 colour images in 10 classes, with 6000 images per class. There are 50000 training images and 10000 test images.
Krizhevsky (n.d.)
It is a slightly more complex dataset compared to MNIST and hence neural networks will have a bit more difficulty to achieve good performance on the dataset. As you can see in the image below, CIFAR-10 contains a broad range of common objects - like frog, truck, deer, automobile, and so forth.
What you'll need to run this model
Now that you understand a few things about the dataset that you will be training the model with, it's time to get coding!
First, you'll need to ensure that you can actually run the model. In other words, you'll need to make sure that you have all the dependencies installed onto your system.
For today's code, that will be relatively easy. You will need the following in order to run the model successfully:
- A recent version of Python.
- A recent version of the
numpypackage. - Obviously, a recent version (2.x) of
tensorflow, which comes with the Keras library for building a neural network.
Let's start writing some code: TensorFlow imports
Enough theory for now - it's time to start writing some code!
Open up your code editor, create a file (e.g. resnet.py) or a Jupyter Notebook, and write down these imports:
import os
import numpy as np
import tensorflow
from tensorflow.keras import Model
from tensorflow.keras.datasets import cifar10
from tensorflow.keras.layers import Add, GlobalAveragePooling2D,\
    Dense, Flatten, Conv2D, Lambda, Input, BatchNormalization, Activation
from tensorflow.keras.optimizers import schedules, SGD
from tensorflow.keras.callbacks import TensorBoard, ModelCheckpoint
Let's take a brief look at why you will need them:
- With
os, you will perform file IO operations - which makes sense given the fact that you're going to process some input data through a neural network. - With
numpy, abbreviatednp, you will manipulate the input data per the paper's data augmentation choices - we will come back to that. - Then, you'll import
tensorflow. Besides the library itself, you will also need to import some sub dependencies:- You'll use the
Modelclass for instantiating the ResNet that you will be creating. - Obviously, you'll need the
cifar10dataset - it's nice that Keras comes with datasets that can be used out of the box. - A variety of Keras layers are also necessary. These are all described in standard deep learning literature (e.g. Conv2d or Dense). Why they are necessary can be found in the He et al. (2016) paper.
- You're going to implement the learning rate scheduler functionality as
schedulesand the Stochastic Gradient Descent optimizer for optimization purposes. If you're a TensorFlow expert, you'll recognize that weight decay as described in the He et al. paper is not a part of this optimizer. Once again, later in the tutorial, we'll come back to why we use regular SGD instead. - Finally, you'll also import some TensorFlow callbacks, being
TensorBoardandModelCheckpoint- for visualizing your training results and saving your model, respectively.
- You'll use the
Model configuration
You will see that we rely heavily on Python definitions - atomic building blocks that can and will be reused throughout the code. The most widely used component from all the ones that you will create today is model_configuration, which serves to group and output tunable configuration options for your neural network.
Let's briefly walk through them.
First of all, you're going to load the input samples from the CIFAR-10 dataset, because you will need them for computing a few elements in this definition.
Then, you're writing the generic configuration:
- You specify the width, height and the number of image channels for a CIFAR-10 sample.
- You specify the batch size. We set it to 128, because it's one of the design decisions made by He et al.
- As CIFAR-10 has 10 classes, we set
**num_classes**to 10. - He et al. choose a 45/5 validation split. As 5/(45+5) = 0.1, that's the value for our validation split. In other words, 90% of our
input_trainsamples will be used for training, while 10% will be used for validation. - Keras will run in verbosity mode. That is, it will write its outputs to the terminal, so that you have a better idea about training progress.
- In their paper, He et al. specify a value called n. Recall that it stands for the number of residual block groups and that it also relates to the number of layers present in your ResNet. In today's network, we set
n = 3, yielding6n + 2 = 20layers. Indeed, we are building a ResNet-20 model. However, by simply tuning this value forn, you can easily change it into e.g.6n + 2 = 6*9 + 2or a ResNet-56 model. - The initial number of feature maps is set by means of
init_fm_dim. He et al. choose an initial value of 16 feature maps, which increases by a factor two when the feature map size halves. - Recall that He et al. describe two shortcut types - the
identityshortcut and theprojectionshortcut. In their work, they used the identity shortcut for their CIFAR-10 experiments. When training this network with identity shortcuts, you will find better performance compared to projection shortcuts, as described by the He et al. paper as well. However, by simply changing the variable, a different shortcut type will be used. - Using the size of your training and validation (sub) datasets, the number of steps per epoch is computed. Here, we rely on another design decision made in the He et al. paper - namely that they trained their ResNet with 64000 iterations. Using that maximum, we compute the number of steps per epoch for our training and validation data, as well as the number of epochs themselves.
- We then define some hyperparameter related options:
- The loss function - which is categorical crossentropy loss, a pretty standard loss function for multiclass classification problems.
- The learning rate scheduler. Initially, the optimizer will use a learning rate of
0.1. This is a pretty intense learning rate. It will help you to achieve big leaps forward during your initial epochs, but you will subsequently overstep the optimum every time. This is why He et al. use learning rate scheduling in their ResNet - they divide the learning rate by 10 after 32000 and 48000 iterations (i.e., after 50% and 75% of training has completed). We can achieve this through TensorFlow'sPiecewiseConstantDecay. - In the paper, He et al. discuss using He initialization and hence we set it as our initializer.
- The final hyperparameter related option is choosing an optimizer. Here's where we differ slightly from the He et al. findings. In their work, they use Stochastic Gradient Descent (SGD) with the learning rate schedule discussed. They also use a momentum term of 0.9 and weight decay of 0.0001. When developing this ResNet, we found that the Adam optimizer did not work - but that was unexpected. However, we also found that the SGD with weight decay implementation in TensorFlow (more specifically, TensorFlow Addons' SGDW optimizer) did not work properly too! We could only reproduce results similar to those reported in the paper by using default SGD, with momentum, but without weight decay. That's why you'll use
SGD.
- Finally, what remains is to initialize the two callbacks - the TensorBoard callback for visualizing your results and the ModelCheckpoint callback so that an instance of your model is saved after every epoch.
- Your configuration is returned as a Python dictionary.
Quite a bit of a discussion, I agree, but well - this allows you to keep configuration in one place! :D
def model_configuration():
    """
        Get configuration variables for the model.
    """

    # Load dataset for computing dataset size
    (input_train, _), (_, _) = load_dataset()

    # Generic config
    width, height, channels = 32, 32, 3
    batch_size = 128
    num_classes = 10
    validation_split = 0.1 # 45/5 per the He et al. paper
    verbose = 1
    n = 3
    init_fm_dim = 16
    shortcut_type = "identity" # or: projection

    # Dataset size
    train_size = (1 - validation_split) * len(input_train)
    val_size = (validation_split) * len(input_train)

    # Number of steps per epoch is dependent on batch size
    maximum_number_iterations = 64000 # per the He et al. paper
    steps_per_epoch = tensorflow.math.floor(train_size / batch_size)
    val_steps_per_epoch = tensorflow.math.floor(val_size / batch_size)
    epochs = tensorflow.cast(tensorflow.math.floor(maximum_number_iterations / steps_per_epoch),\
        dtype=tensorflow.int64)

    # Define loss function
    loss = tensorflow.keras.losses.CategoricalCrossentropy(from_logits=True)

    # Learning rate config per the He et al. paper
    boundaries = [32000, 48000]
    values = [0.1, 0.01, 0.001]
    lr_schedule = schedules.PiecewiseConstantDecay(boundaries, values)

    # Set layer init
    initializer = tensorflow.keras.initializers.HeNormal()

    # Define optimizer
    optimizer_momentum = 0.9
    optimizer_additional_metrics = ["accuracy"]
    optimizer = SGD(learning_rate=lr_schedule, momentum=optimizer_momentum)

    # Load Tensorboard callback
    tensorboard = TensorBoard(
      log_dir=os.path.join(os.getcwd(), "logs"),
      histogram_freq=1,
      write_images=True
    )

    # Save a model checkpoint after every epoch
    checkpoint = ModelCheckpoint(
        os.path.join(os.getcwd(), "model_checkpoint"),
        save_freq="epoch"
    )

    # Add callbacks to list
    callbacks = [
      tensorboard,
      checkpoint
    ]

    # Create config dictionary
    config = {
        "width": width,
        "height": height,
        "dim": channels,
        "batch_size": batch_size,
        "num_classes": num_classes,
        "validation_split": validation_split,
        "verbose": verbose,
        "stack_n": n,
        "initial_num_feature_maps": init_fm_dim,
        "training_ds_size": train_size,
        "steps_per_epoch": steps_per_epoch,
        "val_steps_per_epoch": val_steps_per_epoch,
        "num_epochs": epochs,
        "loss": loss,
        "optim": optimizer,
        "optim_learning_rate_schedule": lr_schedule,
        "optim_momentum": optimizer_momentum,
        "optim_additional_metrics": optimizer_additional_metrics,
        "initializer": initializer,
        "callbacks": callbacks,
        "shortcut_type": shortcut_type
    }

    return config
Loading the dataset
Because we just worked so hard, it's now time to create a very simple def - haha! :D
Using load_dataset, you will be able to load CIFAR-10 data. It returns four arrays with data:
- A combination of
(input_train, target_train), representing your training samples and their corresponding targets. - Secondly,
(input_test, target_test), which covers your testing samples.
def load_dataset():
    """
        Load the CIFAR-10 dataset
    """
    return cifar10.load_data()
Preprocessing the dataset
Let's now take a look at what must be done for image preprocessing.
The network inputs are 32×32 images, with the per-pixel mean subtracted.
He et al. (2016)
Image preprocessing wise, there's only a small amount of preprocessing necessary - subtracting the per-pixel mean from each input image.
Then, He et al. also apply data augmentation to the input data:
- Adding 4 pixels on each side by means of padding.
- Randomly sampling a 32 x 32 pixel crop from the padded image or its horizontal flip.
We follow the simple data augmentation in [24] for training: 4 pixels are padded on each side, and a 32×32 crop is randomly sampled from the padded image or its horizontal flip.
He et al. (2016)
Let's now implement this in a definition called preprocessed_dataset. In the def, we'll be using ImageDataGenerators for flowing the data, allowing us to specify a variety of data augmentation options.
...but unfortunately, performing padding and cropping is not part of TensorFlow's data augmentation options by default.
Fortunately, on his website, Jung (2018) proposed a method for generating random crops of a specific size from an input image. Let's use these definitions and pay a lot of gratitude to the author:
def random_crop(img, random_crop_size):
    # Note: image_data_format is 'channel_last'
    # SOURCE: https://jkjung-avt.github.io/keras-image-cropping/
    assert img.shape[2] == 3
    height, width = img.shape[0], img.shape[1]
    dy, dx = random_crop_size
    x = np.random.randint(0, width - dx + 1)
    y = np.random.randint(0, height - dy + 1)
    return img[y:(y+dy), x:(x+dx), :]


def crop_generator(batches, crop_length):
    """Take as input a Keras ImageGen (Iterator) and generate random
    crops from the image batches generated by the original iterator.
    SOURCE: https://jkjung-avt.github.io/keras-image-cropping/
    """
    while True:
        batch_x, batch_y = next(batches)
        batch_crops = np.zeros((batch_x.shape[0], crop_length, crop_length, 3))
        for i in range(batch_x.shape[0]):
            batch_crops[i] = random_crop(batch_x[i], (crop_length, crop_length))
        yield (batch_crops, batch_y)
We can implement them in our preprocessed_dataset def.
- First, you load the dataset arrays with
load_dataset(). - You'll then retrieve some necessary configuration options from the configuration dictionary.
- You now use
tensorflow.padto pad 4 pixels on each side in the 2nd and 3rd dimension of your input data. Recall that in TensorFlow, which follows a channels-last strategy, a batch of data can be described as being(batch_size, rows, cols, channels). We don't need to manipulate the batch size or the channels, only the rows and columns. That's why we use these dimensions only. - Then, you convert the scalar targets (i.e., integer values) into categorical format by means of one-hot encoding. This way, you'll be able to use categorical crossentropy loss.
- Now, you define a data generator for your training data. A data generator will make available some inputs by means of the generator principle. Today, you'll use the following options:
- With
validation_split, you'll indicate what part of the data must be used for validation purposes. - Horizontal flip implements the "or its horizontal flip" part from the data augmentation design in He et al. to our padded input image before random cropping.
- Rescaling by 1/255 is performed to ensure that gradients don't explode.
- Finally, you'll use TensorFlow's default ResNet preprocessing for doing the rest of your preprocessing work.
- With
The images are converted from RGB to BGR, then each color channel is zero-centered with respect to the ImageNet dataset, without scaling.
TensorFlow (n.d.)
- From this
train_generator, you'll generate the training and validation batches. Using.flow, you'll flow the training data to the data generator, taking only the training or validation part depending on the subset configuration. Then, you'll usecrop_generatorto convert the batches (which are 40x40 padded and possibly flipped images) to 32x32 format again, i.e., the "random crop". - Then, you'll do the same for testing data, except for the flipping and padding/cropping - this is also per the He et al. paper.
- Finally, you return the training, validation and test batches.
For testing, we only evaluate the single view of the original 32×32 image.
He et al. (2016)
def preprocessed_dataset():
    """
        Load and preprocess the CIFAR-10 dataset.
    """
    (input_train, target_train), (input_test, target_test) = load_dataset()

    # Retrieve shape from model configuration and unpack into components
    config = model_configuration()
    width, height, dim = config.get("width"), config.get("height"),\
        config.get("dim")
    num_classes = config.get("num_classes")

    # Data augmentation: perform zero padding on datasets
    paddings = tensorflow.constant([[0, 0,], [4, 4], [4, 4], [0, 0]])
    input_train = tensorflow.pad(input_train, paddings, mode="CONSTANT")

    # Convert scalar targets to categorical ones
    target_train = tensorflow.keras.utils.to_categorical(target_train, num_classes)
    target_test = tensorflow.keras.utils.to_categorical(target_test, num_classes)

    # Data generator for training data
    train_generator = tensorflow.keras.preprocessing.image.ImageDataGenerator(
        validation_split = config.get("validation_split"),
        horizontal_flip = True,
        rescale = 1./255,
        preprocessing_function = tensorflow.keras.applications.resnet50.preprocess_input
    )

    # Generate training and validation batches
    train_batches = train_generator.flow(input_train, target_train, batch_size=config.get("batch_size"), subset="training")
    validation_batches = train_generator.flow(input_train, target_train, batch_size=config.get("batch_size"), subset="validation")
    train_batches = crop_generator(train_batches, config.get("height"))
    validation_batches = crop_generator(validation_batches, config.get("height"))

    # Data generator for testing data
    test_generator = tensorflow.keras.preprocessing.image.ImageDataGenerator(
        preprocessing_function = tensorflow.keras.applications.resnet50.preprocess_input,
        rescale = 1./255)

    # Generate test batches
    test_batches = test_generator.flow(input_test, target_test, batch_size=config.get("batch_size"))

    return train_batches, validation_batches, test_batches
Creating the Residual block
Now, it's time for creating the actual residual block. Recall from the section recapping ResNets above that a residual block is composed of two methods:
- The regular mapping.
- A skip connection.
Using the Functional API, we can effectively create these paths and finally merge them back together.
So, in the definition, you will first load the initializer from your model configuration. You will need it for initializing the Conv2D layers that you will specify next.
Then, you create the skip connection - x_skip - based on the input x. You will later re-add this variable to the output of your residual block, effectively creating the skip connection as described in the section above.
Next up is performing the original mapping. Per the He et al. paper, each residual block is composed of 2 convolutional layers with a 3x3 kernel size. Depending on whether you'll need to match the size of your first Conv2D layer with the output filter maps (which is a lower amount), you'll be using a different stride.
Then we use a stack of 6n layers with 3×3 convolutions on the feature maps of sizes {32, 16, 8} respectively, with 2n layers for each feature map size.
He et al. paper
Each layer is followed by Batch Normalization and a ReLU activation function.
Then it's time to add the skip connection. You will do this by means of Add(). However, sometimes, the number of filters in x no longer matches the number of filters in x_skip... which happens because the number of feature maps is increased with each group of residual blocks.
There are multiple ways of overcoming this issue:
(A) zero-padding shortcuts are used for increasing dimensions, and all shortcuts are parameter free (the same as Table 2 and Fig. 4 right); (B) projection shortcuts are used for increasing dimensions, and other shortcuts are identity; and (C) all shortcuts are projections.
He et al. paper
We can implement these so-called identity shortcuts by padding zeros to the left and right side of your channel dimension, using the Lambda layer. This layer type essentially allows us to manipulate our Tensors in any way, returning the result. It works as follows:
- Of the input Tensor
x, where the 2nd and 3rd dimensions (rows and columns) are reduced in size by a factor 2, we applynumber_of_filters//4to each side of the feature map size dimension. In other words, we expand the number of filters by 2 (which is necessary for the next group of residual blocks) but using 50% on each side.
Another option is a projection mapping. You then simply use a Conv2D layer with a 1x1 kernel size and 2 stride for generating the projection.
As He et al. found identity mappings to work best, the configuration is set to identity by default. You can change it to projection by adapting the model configuration.
Finally, the combined output/skip connection is nonlinearly activated with ReLU before being passed to the next residual block.
def residual_block(x, number_of_filters, match_filter_size=False):
    """
        Residual block with
    """
    # Retrieve initializer
    config = model_configuration()
    initializer = config.get("initializer")

    # Create skip connection
    x_skip = x

    # Perform the original mapping
    if match_filter_size:
        x = Conv2D(number_of_filters, kernel_size=(3, 3), strides=(2,2),\
            kernel_initializer=initializer, padding="same")(x_skip)
    else:
        x = Conv2D(number_of_filters, kernel_size=(3, 3), strides=(1,1),\
            kernel_initializer=initializer, padding="same")(x_skip)
    x = BatchNormalization(axis=3)(x)
    x = Activation("relu")(x)
    x = Conv2D(number_of_filters, kernel_size=(3, 3),\
        kernel_initializer=initializer, padding="same")(x)
    x = BatchNormalization(axis=3)(x)

    # Perform matching of filter numbers if necessary
    if match_filter_size and config.get("shortcut_type") == "identity":
        x_skip = Lambda(lambda x: tensorflow.pad(x[:, ::2, ::2, :], tensorflow.constant([[0, 0,], [0, 0], [0, 0], [number_of_filters//4, number_of_filters//4]]), mode="CONSTANT"))(x_skip)
    elif match_filter_size and config.get("shortcut_type") == "projection":
        x_skip = Conv2D(number_of_filters, kernel_size=(1,1),\
            kernel_initializer=initializer, strides=(2,2))(x_skip)

    # Add the skip connection to the regular mapping
    x = Add()([x, x_skip])

    # Nonlinearly activate the result
    x = Activation("relu")(x)

    # Return the result
    return x
Creating the ResidualBlocks structure
Now that we have the structure of a residual block, it's time to create the logic for specifying all our residual blocks. You can do so as follows:
- First, like always, retrieving the model configuration, and from it the initial filter size.
- The paper suggests that a ResNet is built using a stack of
6nlayers with2nlayers for each feature map size.6nlayers divided by2nlayers for each feature map size, means that there will be6n/2n = 3groups of residual blocks, with 3 filter map sizes.- Indeed, He et al. use filter map sizes of 16, 32 and 64, respectively.
- Using a
forloop, we can simply iterate over this number of groups. - Each block in our code has 2 weighted layers (see the 2 Conv layers above, excluding the one for the skip connection should a projection mapping be used), and each group has
2nlayers (per the paper and defined above). This means that there will be2n/2 = nblocks per group. That's why you'll create another for loop, creatingnblocks. - The rest is simple: if it's the second layer group or higher and it's the first block within the group, you increase the filter size by a factor two (per the paper) and then specify the
residual_block, instructing it to match filter sizes (by manipulating the input and the skip connection using the identity or projection mapping). - If not, you simply specify the
residual_block.
For example, with n = 3, this yields 6n = 6*3 = 18 layers in your residual blocks and 2n = 2*3 = 6 layers per group. Indeed, with 3 groups, this matches. Finally, with n = 3, you will have 6n+2 = 6 * 3 + 2 = 20 layers in your network. Indeed, that's a ResNet-20! :)
def ResidualBlocks(x):
    """
        Set up the residual blocks.
    """
    # Retrieve values
    config = model_configuration()

    # Set initial filter size
    filter_size = config.get("initial_num_feature_maps")

    # Paper: "Then we use a stack of 6n layers (...)
    #   with 2n layers for each feature map size."
    # 6n/2n = 3, so there are always 3 groups.
    for layer_group in range(3):

        # Each block in our code has 2 weighted layers,
        # and each group has 2n such blocks,
        # so 2n/2 = n blocks per group.
        for block in range(config.get("stack_n")):

            # Perform filter size increase at every
            # first layer in the 2nd block onwards.
            # Apply Conv block for projecting the skip
            # connection.
            if layer_group > 0 and block == 0:
                filter_size *= 2
                x = residual_block(x, filter_size, match_filter_size=True)
            else:
                x = residual_block(x, filter_size)

    # Return final layer
    return x
Model base: stacking your building blocks
Then, after creating the structure for the residual blocks, it's time to finalize the model by specifying its base structure. Recall that a ResNet is composed of 6n+2 weighted layers, and that you have created 6n such layers so far. Two more to go!
From the paper:
The first layer is 3×3 convolutions (...) The network ends with a global average pooling, a 10-way fully-connected layer, and softmax.
He et al.
Let's add them:
- First of all, the inputs to your neural network are passed to the
Inputlayer. This is a default Keras layer that is capable of picking up inputs served to the model. - Then, you create the initial 3x3 kernel size
Conv2Dlayer with the initial number of filter maps, a 1x1 stride, zeros padding if necessary and the kernel initializer specified in the model configuration (remember, that would be He initialization, in line with the paper). - This is followed by Batch Normalization and ReLU activation - pretty standard in these networks.
- Then, you let the input pass through the
6nResidualBlocksthat you created above. - Subsequently, your data flows through a
GlobalAveragePooling2Dnonweighted layer, performing global average pooling. - Finally, your data is flattened, so that it can be processed by a fully-connected layer (
Denselayer), also initialized using He initialization. This outputs a(num_classes, )shaped logits Tensor, which in the case of CIFAR-10 is(10, )because ofnum_classes = 10. - Finally, references to
inputsandoutputsare returned so that the model can be initialized.
def model_base(shp):
    """
        Base structure of the model, with residual blocks
        attached.
    """
    # Get number of classes from model configuration
    config = model_configuration()
    initializer = model_configuration().get("initializer")

    # Define model structure
    # logits are returned because Softmax is pushed to loss function.
    inputs = Input(shape=shp)
    x = Conv2D(config.get("initial_num_feature_maps"), kernel_size=(3,3),\
        strides=(1,1), kernel_initializer=initializer, padding="same")(inputs)
    x = BatchNormalization()(x)
    x = Activation("relu")(x)
    x = ResidualBlocks(x)
    x = GlobalAveragePooling2D()(x)
    x = Flatten()(x)
    outputs = Dense(config.get("num_classes"), kernel_initializer=initializer)(x)

    return inputs, outputs
Model initialization
Now on to the simple part: model initialization.
You have built your ResNet model, and it's time to initialize it. Doing so is easy but requires the layer structure: for this, you simply call the model_base definition using some input parameters representing input sample shape shp, and you assign its outputs to inputs, outputs.
Now that you have these layer references, you can actually initialize the model by means of the Keras Model class. You specify the inputs and outputs and give it a name, like resnet (per the model configuration).
Then, you compile the model with model.compile using the loss function, optimizer and additional metrics configured in your model configuration, print the model summary, and return the model.
Time to start training! :)
def init_model():
    """
        Initialize a compiled ResNet model.
    """
    # Get shape from model configuration
    config = model_configuration()

    # Get model base
    inputs, outputs = model_base((config.get("width"), config.get("height"),\
        config.get("dim")))

    # Initialize and compile model
    model = Model(inputs, outputs, name=config.get("name"))
    model.compile(loss=config.get("loss"),\
                  optimizer=config.get("optim"),\
                    metrics=config.get("optim_additional_metrics"))

    # Print model summary
    model.summary()

    return model
Model training
Keras has a high-level API available for training your model. Recall that we have created our training and validation batches using the ImageDataGenerator before, and that we have an initialized model at this stage.
We simply pass these to the model.fit with a large variety of other configuration options specified in the model configuration.
This will start the training process and return the trained model for evaluation.
def train_model(model, train_batches, validation_batches):
    """
        Train an initialized model.
    """

    # Get model configuration
    config = model_configuration()

    # Fit data to model
    model.fit(train_batches,
              batch_size=config.get("batch_size"),
              epochs=config.get("num_epochs"),
              verbose=config.get("verbose"),
              callbacks=config.get("callbacks"),
              steps_per_epoch=config.get("steps_per_epoch"),
              validation_data=validation_batches,
              validation_steps=config.get("val_steps_per_epoch"))

    return model
Model evaluation
Evaluation is even simpler: you simply pass the test batches to model.evaluate and output the test scores.
def evaluate_model(model, test_batches):
    """
        Evaluate a trained model.
    """
    # Evaluate model
    score = model.evaluate(test_batches, verbose=0)
    print(f'Test loss: {score[0]} / Test accuracy: {score[1]}')
Wrapping up things
So far, we have individual building blocks:
- Building blocks for loading the data.
- Building blocks for building the model layer structure.
- Building blocks for initializing the model.
- ...and for training and evaluating the model.
Let's combine things together now so that we will end up with working code!
In training_process, you will do this.
- First, you retrieve the training, validation and testing batches using
preprocessed_dataset(). - Then, you initialize a compiled ResNet model with
init_model(). - This is followed by training the model using the training and validation batches, by calling
train_model(). - Finally, you'll evaluate the trained model with
evaluate_model().
def training_process():
    """
        Run the training process for the ResNet model.
    """

    # Get dataset
    train_batches, validation_batches, test_batches = preprocessed_dataset()

    # Initialize ResNet
    resnet = init_model()

    # Train ResNet model
    trained_resnet = train_model(resnet, train_batches, validation_batches)

    # Evalute trained ResNet model post training
    evaluate_model(trained_resnet, test_batches)
That's pretty much it!
The only thing that remains is starting the training process when your Python script starts:
if __name__ == "__main__":
    training_process()
And voila! You have a working ResNet model :)
By tweaking with the n parameter in the configuration settings (like He et al. did by setting it to 3, 5, 7 and 9), you can simply spawn, train and evaluate a ResNet-20, ResNet-32, ResNet-44 or ResNet-56 model.
Results for our ResNet-20 on the CIFAR-10 dataset
These are our results when training a ResNet-20 (n = 3) on the CIFAR-10 dataset. Training took approximately 45 minutes:


Clearly, the results of the learning rate scheduler are visible around epoch 90 and 135, both in terms of the learning rate applied (above) and accuracy (validation accuracy is blue; training accuracy is orange).
Subsequently, during model evaluation using our testing data, we found the following scores:
Test loss: 0.6111826300621033 / Test accuracy: 0.8930000066757202
With a 1 - 0.893 = 0.107 test error, results are similar to those found in the ResNet paper (0.0875). Possibly, the omission of weight decay due to reasons of non-convergence played a role here. In that case, you may want to use TensorFlow Addons' SGDW optimizer a try.
Full model code
If you want to get started immediately, here is the full model code for building a ResNet from scratch using TensorFlow 2 and Keras:
import os
import numpy as np
import tensorflow
from tensorflow.keras import Model
from tensorflow.keras.datasets import cifar10
from tensorflow.keras.layers import Add, GlobalAveragePooling2D,\
    Dense, Flatten, Conv2D, Lambda, Input, BatchNormalization, Activation
from tensorflow.keras.optimizers import schedules, SGD
from tensorflow.keras.callbacks import TensorBoard, ModelCheckpoint


def model_configuration():
    """
        Get configuration variables for the model.
    """

    # Load dataset for computing dataset size
    (input_train, _), (_, _) = load_dataset()

    # Generic config
    width, height, channels = 32, 32, 3
    batch_size = 128
    num_classes = 10
    validation_split = 0.1 # 45/5 per the He et al. paper
    verbose = 1
    n = 3
    init_fm_dim = 16
    shortcut_type = "identity" # or: projection

    # Dataset size
    train_size = (1 - validation_split) * len(input_train)
    val_size = (validation_split) * len(input_train)

    # Number of steps per epoch is dependent on batch size
    maximum_number_iterations = 64000 # per the He et al. paper
    steps_per_epoch = tensorflow.math.floor(train_size / batch_size)
    val_steps_per_epoch = tensorflow.math.floor(val_size / batch_size)
    epochs = tensorflow.cast(tensorflow.math.floor(maximum_number_iterations / steps_per_epoch),\
        dtype=tensorflow.int64)

    # Define loss function
    loss = tensorflow.keras.losses.CategoricalCrossentropy(from_logits=True)

    # Learning rate config per the He et al. paper
    boundaries = [32000, 48000]
    values = [0.1, 0.01, 0.001]
    lr_schedule = schedules.PiecewiseConstantDecay(boundaries, values)

    # Set layer init
    initializer = tensorflow.keras.initializers.HeNormal()

    # Define optimizer
    optimizer_momentum = 0.9
    optimizer_additional_metrics = ["accuracy"]
    optimizer = SGD(learning_rate=lr_schedule, momentum=optimizer_momentum)

    # Load Tensorboard callback
    tensorboard = TensorBoard(
      log_dir=os.path.join(os.getcwd(), "logs"),
      histogram_freq=1,
      write_images=True
    )

    # Save a model checkpoint after every epoch
    checkpoint = ModelCheckpoint(
        os.path.join(os.getcwd(), "model_checkpoint"),
        save_freq="epoch"
    )

    # Add callbacks to list
    callbacks = [
      tensorboard,
      checkpoint
    ]

    # Create config dictionary
    config = {
        "width": width,
        "height": height,
        "dim": channels,
        "batch_size": batch_size,
        "num_classes": num_classes,
        "validation_split": validation_split,
        "verbose": verbose,
        "stack_n": n,
        "initial_num_feature_maps": init_fm_dim,
        "training_ds_size": train_size,
        "steps_per_epoch": steps_per_epoch,
        "val_steps_per_epoch": val_steps_per_epoch,
        "num_epochs": epochs,
        "loss": loss,
        "optim": optimizer,
        "optim_learning_rate_schedule": lr_schedule,
        "optim_momentum": optimizer_momentum,
        "optim_additional_metrics": optimizer_additional_metrics,
        "initializer": initializer,
        "callbacks": callbacks,
        "shortcut_type": shortcut_type
    }

    return config


def load_dataset():
    """
        Load the CIFAR-10 dataset
    """
    return cifar10.load_data()


def random_crop(img, random_crop_size):
    # Note: image_data_format is 'channel_last'
    # SOURCE: https://jkjung-avt.github.io/keras-image-cropping/
    assert img.shape[2] == 3
    height, width = img.shape[0], img.shape[1]
    dy, dx = random_crop_size
    x = np.random.randint(0, width - dx + 1)
    y = np.random.randint(0, height - dy + 1)
    return img[y:(y+dy), x:(x+dx), :]


def crop_generator(batches, crop_length):
    """Take as input a Keras ImageGen (Iterator) and generate random
    crops from the image batches generated by the original iterator.
    SOURCE: https://jkjung-avt.github.io/keras-image-cropping/
    """
    while True:
        batch_x, batch_y = next(batches)
        batch_crops = np.zeros((batch_x.shape[0], crop_length, crop_length, 3))
        for i in range(batch_x.shape[0]):
            batch_crops[i] = random_crop(batch_x[i], (crop_length, crop_length))
        yield (batch_crops, batch_y)


def preprocessed_dataset():
    """
        Load and preprocess the CIFAR-10 dataset.
    """
    (input_train, target_train), (input_test, target_test) = load_dataset()

    # Retrieve shape from model configuration and unpack into components
    config = model_configuration()
    width, height, dim = config.get("width"), config.get("height"),\
        config.get("dim")
    num_classes = config.get("num_classes")

    # Data augmentation: perform zero padding on datasets
    paddings = tensorflow.constant([[0, 0,], [4, 4], [4, 4], [0, 0]])
    input_train = tensorflow.pad(input_train, paddings, mode="CONSTANT")

    # Convert scalar targets to categorical ones
    target_train = tensorflow.keras.utils.to_categorical(target_train, num_classes)
    target_test = tensorflow.keras.utils.to_categorical(target_test, num_classes)

    # Data generator for training data
    train_generator = tensorflow.keras.preprocessing.image.ImageDataGenerator(
        validation_split = config.get("validation_split"),
        horizontal_flip = True,
        rescale = 1./255,
        preprocessing_function = tensorflow.keras.applications.resnet50.preprocess_input
    )

    # Generate training and validation batches
    train_batches = train_generator.flow(input_train, target_train, batch_size=config.get("batch_size"), subset="training")
    validation_batches = train_generator.flow(input_train, target_train, batch_size=config.get("batch_size"), subset="validation")
    train_batches = crop_generator(train_batches, config.get("height"))
    validation_batches = crop_generator(validation_batches, config.get("height"))

    # Data generator for testing data
    test_generator = tensorflow.keras.preprocessing.image.ImageDataGenerator(
        preprocessing_function = tensorflow.keras.applications.resnet50.preprocess_input,
        rescale = 1./255)

    # Generate test batches
    test_batches = test_generator.flow(input_test, target_test, batch_size=config.get("batch_size"))

    return train_batches, validation_batches, test_batches


def residual_block(x, number_of_filters, match_filter_size=False):
    """
        Residual block with
    """
    # Retrieve initializer
    config = model_configuration()
    initializer = config.get("initializer")

    # Create skip connection
    x_skip = x

    # Perform the original mapping
    if match_filter_size:
        x = Conv2D(number_of_filters, kernel_size=(3, 3), strides=(2,2),\
            kernel_initializer=initializer, padding="same")(x_skip)
    else:
        x = Conv2D(number_of_filters, kernel_size=(3, 3), strides=(1,1),\
            kernel_initializer=initializer, padding="same")(x_skip)
    x = BatchNormalization(axis=3)(x)
    x = Activation("relu")(x)
    x = Conv2D(number_of_filters, kernel_size=(3, 3),\
        kernel_initializer=initializer, padding="same")(x)
    x = BatchNormalization(axis=3)(x)

    # Perform matching of filter numbers if necessary
    if match_filter_size and config.get("shortcut_type") == "identity":
        x_skip = Lambda(lambda x: tensorflow.pad(x[:, ::2, ::2, :], tensorflow.constant([[0, 0,], [0, 0], [0, 0], [number_of_filters//4, number_of_filters//4]]), mode="CONSTANT"))(x_skip)
    elif match_filter_size and config.get("shortcut_type") == "projection":
        x_skip = Conv2D(number_of_filters, kernel_size=(1,1),\
            kernel_initializer=initializer, strides=(2,2))(x_skip)

    # Add the skip connection to the regular mapping
    x = Add()([x, x_skip])

    # Nonlinearly activate the result
    x = Activation("relu")(x)

    # Return the result
    return x


def ResidualBlocks(x):
    """
        Set up the residual blocks.
    """
    # Retrieve values
    config = model_configuration()

    # Set initial filter size
    filter_size = config.get("initial_num_feature_maps")

    # Paper: "Then we use a stack of 6n layers (...)
    #   with 2n layers for each feature map size."
    # 6n/2n = 3, so there are always 3 groups.
    for layer_group in range(3):

        # Each block in our code has 2 weighted layers,
        # and each group has 2n such blocks,
        # so 2n/2 = n blocks per group.
        for block in range(config.get("stack_n")):

            # Perform filter size increase at every
            # first layer in the 2nd block onwards.
            # Apply Conv block for projecting the skip
            # connection.
            if layer_group > 0 and block == 0:
                filter_size *= 2
                x = residual_block(x, filter_size, match_filter_size=True)
            else:
                x = residual_block(x, filter_size)

    # Return final layer
    return x


def model_base(shp):
    """
        Base structure of the model, with residual blocks
        attached.
    """
    # Get number of classes from model configuration
    config = model_configuration()
    initializer = model_configuration().get("initializer")

    # Define model structure
    # logits are returned because Softmax is pushed to loss function.
    inputs = Input(shape=shp)
    x = Conv2D(config.get("initial_num_feature_maps"), kernel_size=(3,3),\
        strides=(1,1), kernel_initializer=initializer, padding="same")(inputs)
    x = BatchNormalization()(x)
    x = Activation("relu")(x)
    x = ResidualBlocks(x)
    x = GlobalAveragePooling2D()(x)
    x = Flatten()(x)
    outputs = Dense(config.get("num_classes"), kernel_initializer=initializer)(x)

    return inputs, outputs


def init_model():
    """
        Initialize a compiled ResNet model.
    """
    # Get shape from model configuration
    config = model_configuration()

    # Get model base
    inputs, outputs = model_base((config.get("width"), config.get("height"),\
        config.get("dim")))

    # Initialize and compile model
    model = Model(inputs, outputs, name=config.get("name"))
    model.compile(loss=config.get("loss"),\
                  optimizer=config.get("optim"),\
                    metrics=config.get("optim_additional_metrics"))

    # Print model summary
    model.summary()

    return model


def train_model(model, train_batches, validation_batches):
    """
        Train an initialized model.
    """

    # Get model configuration
    config = model_configuration()

    # Fit data to model
    model.fit(train_batches,
              batch_size=config.get("batch_size"),
              epochs=config.get("num_epochs"),
              verbose=config.get("verbose"),
              callbacks=config.get("callbacks"),
              steps_per_epoch=config.get("steps_per_epoch"),
              validation_data=validation_batches,
              validation_steps=config.get("val_steps_per_epoch"))

    return model


def evaluate_model(model, test_batches):
    """
        Evaluate a trained model.
    """
    # Evaluate model
    score = model.evaluate(test_batches, verbose=0)
    print(f'Test loss: {score[0]} / Test accuracy: {score[1]}')


def training_process():
    """
        Run the training process for the ResNet model.
    """

    # Get dataset
    train_batches, validation_batches, test_batches = preprocessed_dataset()

    # Initialize ResNet
    resnet = init_model()

    # Train ResNet model
    trained_resnet = train_model(resnet, train_batches, validation_batches)

    # Evalute trained ResNet model post training
    evaluate_model(trained_resnet, test_batches)


if __name__ == "__main__":
    training_process()
References
MachineCurve. (2022, January 13). ResNet, a simple introduction – MachineCurve. https://www.machinecurve.com/index.php/2022/01/13/resnet-a-simple-introduction/
He, K., Zhang, X., Ren, S., & Sun, J. (2016). Deep residual learning for image recognition. In Proceedings of the IEEE conference on computer vision and pattern recognition (pp. 770-778).
Krizhevsky, A. (n.d.). CIFAR-10 and CIFAR-100 datasets. Department of Computer Science, University of Toronto. https://www.cs.toronto.edu/~kriz/cifar.html
Jung, J. K. (2018, April 16). Extending Keras' ImageDataGenerator to support random cropping. JK Jung's blog. https://jkjung-avt.github.io/keras-image-cropping/
TensorFlow. (n.d.). Tf.keras.applications.resnet50.preprocess_input. https://www.tensorflow.org/api_docs/python/tf/keras/applications/resnet50/preprocess_input

Hi, I'm Chris!
I know a thing or two about AI and machine learning. Welcome to MachineCurve.com, where machine learning is explained in gentle terms.
Getting started
Foundation models
Learn how large language models and other foundation models are working and how you can train open source ones yourself.
Keras
Keras is a high-level API for TensorFlow. It is one of the most popular deep learning frameworks.
Machine learning theory
Read about the fundamentals of machine learning, deep learning and artificial intelligence.
Most recent articles
January 2, 2024
What is Retrieval-Augmented Generation?
December 27, 2023
In-Context Learning: what it is and how it works
December 22, 2023
CLIP: how it works, how it's trained and how to use it
Article tags
Most popular articles
February 18, 2020
How to use K-fold Cross Validation with TensorFlow 2 and Keras?
December 28, 2020
Introduction to Transformers in Machine Learning
December 27, 2021
StyleGAN, a step-by-step introduction
July 17, 2019
This Person Does Not Exist - how does it work?
October 26, 2020
Your First Machine Learning Project with TensorFlow 2.0 and Keras
Connect on social media
Connect with me on LinkedIn
To get in touch with me, please connect with me on LinkedIn. Make sure to write me a message saying hi!
Side info
The content on this website is written for educational purposes. In writing the articles, I have attempted to be as correct and precise as possible. Should you find any errors, please let me know by creating an issue or pull request in this GitHub repository.
All text on this website written by me is copyrighted and may not be used without prior permission. Creating citations using content from this website is allowed if a reference is added, including an URL reference to the referenced article.
If you have any questions or remarks, feel free to get in touch.
TensorFlow, the TensorFlow logo and any related marks are trademarks of Google Inc.
PyTorch, the PyTorch logo and any related marks are trademarks of The Linux Foundation.
Montserrat and Source Sans are fonts licensed under the SIL Open Font License version 1.1.
Mathjax is licensed under the Apache License, Version 2.0.